Chapter 15
Prototypes and user tests
It’s easy to be turned off by the very mention of a prototype or a user test. They often evoke images of disposable, time-consuming, expensive pieces of work.
However you feel about these topics, and however experienced you are at interface design, do not skip this step. This is the biggest test of our work to date. It highlights real issues with the interface, and our choice and implementation of app features while they are still easy and cheap to change. Not to be overly dramatic, but it can make or break the app.
It’s also surprisingly quick and inexpensive – you’ll see results from as little as thirty minutes’ effort.
Prototyping
With the knowledge of interaction design, composition, grids, hierarchy and style firmly implanted in your mind, it’s time to sketch out – wireframe – potential app interfaces.
If you work in a small team, you may find it useful to involve the whole team in this process. If you’re designing the app for a client, their inclusion may help to communicate and improve design decisions.
One caveat: only include people who have knowledge of the personas and subsequent feature decision process. Too many times I’ve seen a wireframe session dominated by a headstrong developer who thinks that the app should be designed around their way of working. The benefits of including multiple people are the communication of design decisions and the increased chance that someone will regularly jump in with, “How would the Simon persona use that? ” It’s not design by committee.
-
Select your key screens
If you have the time and capability to create a wireframe for every screen of the app, it certainly won’t hurt. Practically though, you only need to prototype the most important screens, and you can usually normalise many of the screens into a single wireframe.
For example, Twitter and Facebook both use similar screens for your home feed and another person’s profile, so only one wireframe would be created for each of these two screens. Both apps only need about four key wireframes that are vital to their success: user registration, the main feed, people search, and the people search results screen.
If you’re creating a minimum viable product (MVP) you shouldn’t need more than about four or five key screens. Once your MVP is launched, you can wireframe individual non-trivial features as you build them.
-
List the screen elements
Next, list all the visual elements (text, buttons, forms, graphs, menus) that appear on a screen. If you’re working by yourself just use pen and paper.
Start with the most important screen, the one where the user will spend most of their time. We’re likely to re-use many of the design elements across screens so we need to ensure they are designed to function best on the main screen, if your app has one.
Include any screen elements that aren’t displayed by default such as warnings, errors, alternative states and feedback.
Let’s return to the cookery app from earlier. For the sake of argument, suppose that on further consideration of the strategic output, it was decided that the MVP would consist of just a single feature: find an alternative ingredient.
Although this is a shift away from the original concept, it reaches the greatest possible audience for the smallest number of features. Alternative ingredients don’t just appeal to unprepared cooks, but also to people suffering from allergies, diabetes or other health problems, as well as those whose religious or ethical beliefs influence what they eat.
The screen elements for the main search screen might be:
- A search box
- An exception message for bad searches
- Popular searches
- Auto-suggest matches as the user types
- Food category searches, e.g. vegetarian, healthy, lactose intolerant
- A description of the service
- A link to add an alternative ingredient
- My recent searches
- The app logo
-
Group and prioritise screen elements
Some of the items in the list will naturally belong together. Place the items into groups and prioritise the groups from most to least important.
- (a, b, d) a search box, exception message, auto-suggest matches
- (c, e, h) popular searches, grouped searches, my recent searches
- (i, f) the app logo, a description of the service
- (g) a link to add an alternative ingredient
This should be a fairly quick task for small MVP apps. If your screen needs a higher degree of complexity and you end up with dozens of elements to group and prioritise, it might be worth performing a simple card sorting exercise. Write each item on an index card or Post-it note and ask a number of team members or friends to independently place the cards into groups, and then the groups into order of importance. A common pattern of groups and priorities should emerge.
-
Low fidelity mockup of each group
Now it’s time to sketch out each group. These are low fidelity ideas for how each part of the interface could look. You really don’t need any artistic ability, so dive in.
This is a creative process where you generate multiple interface ideas for each group of elements, so don’t worry about getting it right first time. The groups aren’t set in stone either, so if you decide that recent searches is more closely related to the search box than to popular searches, then go with it. That’s the whole point – to iterate and update these ideas now rather than later.
Don’t worry about consistency between elements yet: sketch out each part of the interface without preconceptions about their relative size or position. Don’t visualise them all squeezing on to the same page; we want the page to work around them, not vice versa.

Lo-fi sketches of interface elements
This step really does work best with pen (or pencil) and paper. We need to quickly iterate basic ideas and see what does and doesn’t work, so skip the software for the time being.
-
Wireframe
Now put the pieces together, keeping in mind the priority of each group. At this stage of the iteration, we’re still not concerned about exact alignment to a grid system, colours or typography. This is about visually assessing the balance, priority and interaction between elements on the page.
Pen and paper can be useful for an initial assessment of simpler pages, but at this stage we are concerned with rearranging and subtly adjusting blocks of elements, so it is usually quicker to use alternative tools. In order of sophistication, you might want to investigate the following.
Post-it notes
Sketch each element group on a cut-to-size Post-it note, to make it easy to rearrange features. You can even colour-code related blocks using differently coloured Post-it notes. If you need to adjust the appearance of one of the elements, you only need to redraw a single sticky note rather than the entire page.
PowerPoint or Keynote
I dislike receiving web designs in PowerPoint files as much as the next person, but presentation software can be a useful tool for quickly sketching, grouping and arranging basic wireframe elements.
Google Docs Drawings
The Google Docs1 suite of tools has a dedicated drawing application. Although it doesn’t specifically cater to web app interface wireframes, it can be a useful tool if you want to collaborate remotely on the wireframe as multiple users can edit the drawing simultaneously.
Dedicated web application
There are dozens of web apps designed to speed up and improve the interface wireframe process. Mockingbird2 is one of the best and it’s easy to get started with. The Pencil Project3 offers an alternative as a Firefox extension.
Dedicated desktop application
Balsamiq Mockups4 is a very good commercial desktop product for wireframe design. If you already own Microsoft Visio or OmniGraffle, there are plenty of web wireframe stencils available to speed up the process. Try to choose one that retains a sketch-like lo-fi style, to visually reinforce the unfinished nature of the design and to prevent you thinking about too much detail.
My personal preference is to use dedicated wireframe/mockup tools, either web apps or desktop software, as their built-in libraries of common browser GUI elements makes the process even quicker than pen and paper.
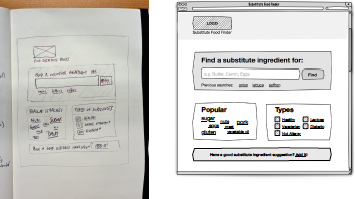
The same wireframe created with pen and paper (left) and OmniGraffle (right). Once all the elements were placed on the page, I decided to add icons to the types of substitutes list. This doesn’t only aid usability, but also adds bottom-right weight to balance the top-left-heavy logo
It’s worth testing this early wireframe by placing it under a few people’s noses, but don’t use this as a substitute for user testing a high fidelity mockup later. As I mentioned previously, colour and other minutiae can drastically alter the user experience and need to be tested.
-
Prototype
Finally, it’s time to create a prototype interface that can be user tested. Although this interface is likely to be iterated a number of times, you should start to add aesthetic details that can influence the user experience: colours, grid alignment and typography.

A first iteration prototype of the interface, with tasty food colours and grid alignment, ready for user testing
You can use Photoshop, Fireworks or any other graphic design software to create a flat prototype image file but, ideally, you want it to be interactive so that you don’t need to manually describe behaviour during user tests, which can influence the user.
Interactivity doesn’t have to be real – it doesn’t need to be hooked into any code – but the interface should appear to react how you might expect it to, even if the feedback is hard-coded.
Options for creating an interactive prototype include
:
- Flat image files that are embedded in simple HTML image maps, so that the user can click on a part of the interface and be taken to the relevant next screen.
- Exporting slices and HTML from software like Fireworks, to create an HTML page with simple functionality.
- If you’re a fast coder you can hand-code the prototype interface in HTML, CSS and JavaScript, taking advantage of libraries and tools like Blueprint CSS5 and IxEdit6.
- Prototyping software such as Axure RP7 or Serena Prototype Composer8, which may be overkill for many simpler web apps.
- Before I mention the last option, you have to promise not to burn this book as soon as you read it. Promise? OK then… WYSIWYG web design software like Dreamweaver9, Microsoft Expression Web10 and Adobe Muse11 allow you to rapidly create prototype interfaces. Remember, you’re not testing the quality of the output code, just the interface. Don’t let stigma put you off these highly practical options.
User testing
User tests afford valuable insight into user behaviour, interface usability and the match between user expectations and web app functionality. When performed at the prototype stage the early insight allows us to:
- Pre-emptively identify and fix issues with the proposed choice and implementation of features.
- Identify and remove redundant features to save development costs.
- Optimise the user experience to increase customer satisfaction, conversion and word-of-mouth marketing.
- Remove frustrations that could result in expensive customer support.
User tests can also be conducted with more or less than prototypes: they are a useful tool for analysing apps that have already launched, or even, when conducted against a competitor site, a strategic planning tool for the very early stages of a project.
User tests are not particularly complicated: appropriate users are asked to perform a number of set tasks with the app while their actions and vocalised thoughts are monitored. In order to get the most from the tests, however, it’s worth spending a little time on the details of planning and execution.
You can hire expert usability agencies to worry about the details for you. They will select relevant users, plan the tasks, moderate the sessions and summarise the findings. Unfortunately, this can cost tens of thousands of dollars.
Fortunately, an informal do-it-yourself approach is practical and inexpensive. It also gives you qualitative feedback that a third-party agency might not convey in a final report, and you get immediate results to action.
The tests
In each test session, a user should be given no more than five tasks to perform within a maximum of forty-five minutes, beyond which their feedback and behaviour may become influenced by fatigue and a desire to leave.
If you conduct several tests on the same day, try to leave between twenty and thirty minutes between sessions to accommodate post-test discussions with your team, overruns and users turning up late.
The number of test users will depend on the scale of your app. I’ve found that for niche MVP prototypes there is a strong correlation of behaviour between test users, which allows the majority of issues to be extracted from only one or two sessions. For complex applications, test subjects are more likely to identify unique issues, with diminishing returns as the total number of test users increases. Jakob Nielsen suggests that five users offer the best insight before diminishing returns kick in significantly12.
Planning the tests
Select and check your tasks
It’s unlikely that you’ll be able to test your entire app. Choose and describe tasks that test the most frequently used features and any that you think may suffer from usability issues. A good task description reads more like a scenario than a leading instruction:
Search for an alternative ingredient to satay sauce. (Poor task description)
You have a friend coming around for dinner tonight who is allergic to nuts. Investigate how to update your recipes accordingly. (Good task description)
Be sure to test the tasks yourself to ensure that the prototype is working and responding as you’d expect. You don’t want to waste time with errors and impossible tasks.
Select your metrics
Although a large part of your test results will consist of specific usability issues and qualitative feedback, it’s useful to record quantitative metrics to directly compare successive iterations of the interface or different groups of test users.
Consider recording:
- Completion rates: did the user successfully complete the task?
- Completion time: how long did it take the user to complete the task?
- Completion steps: how many pages/screens/clicks did the user require to complete the task?
- Number and severity of errors
- User satisfaction rating (out of five)
Select your users
You must test with relevant users. There’s no point testing a cooking app with a person who detests cooking and eats frozen pizza most nights of the week.
Describe who you are looking for based on the earlier persona and market research: the demographics and interests of your target users. Use this to recruit appropriate test subjects from wherever you can find them:
- Friends, family and professional contacts
- Your teaser website/blog
- Social media (Facebook, Twitter, LinkedIn and niche networks relevant to your app)
- Noticeboards, mailing lists and classifieds (such as Craigslist and Gumtree)
Determine remuneration
Depending on the competition and excitement of your market, you may find that test subjects don’t need any further incentive. If you find it difficult to recruit people for your tests, or if you want to give them a good feeling about your business, you could consider offering a small reward to participants:
- Early or free access to the web app
- Cash (£10-£20)
- Vouchers (Amazon, cinema tickets)
- Wine or chocolates
Choose your tools
There are dozens of tools to facilitate the user testing process.
At the least personal end of the scale, Feedback Army13 asks arbitrary users to answer your specific task questions, with text-based responses. If your app really is targeting the general population this may provide some value, but to get real insight you need to use an alternative tool.
UserTesting.com14 is slightly more sophisticated. They will find users for you, record a video of them completing the task and send you the results. It’s inexpensive and easy but has some drawbacks. Users can be selected primarily on demographic data, so if you want to choose users who cook at home at least five days a week and use IMDB regularly then you need to rely on their honesty when they self-select for the tests. Furthermore, you don’t get the all-important interaction during the test to ask why they are doing something or what their expectations are.
A better option, if you need to test and interact with your chosen users remotely, is to use a combination of screen sharing and screen recording software. Adobe ConnectNow15 and Skype16 offer robust screen sharing software, and iShowU17 (Mac) and Camtasia Studio18 (Windows) provide screen recording capabilities, together with many other alternative tools.
Better yet, conduct the tests in person and get a complete picture of the nuances of users’ reactions. To record the sessions, you’ll need a webcam (or a built-in laptop camera) and a cheap USB microphone – don’t blow the budget on anything expensive. Then, use software such as Morae19 (Windows) or the excellent Silverback20 (Mac) to record and play back the test sessions and user reactions.
Conducting the tests
On the day of the tests, have everything set up, tested and ready. Welcome the participant and thank them in advance for their time.
You want to make them feel at ease and relaxed, so that the test is as natural as possible. Pay them in advance so that they know that the reward is not dependent on a correct test result. Explain what they’ll be doing and that the app is being tested, not them. Tell them to try their best, but not to be concerned about errors or getting things wrong.
Have them sign a simple waiver, which gives you permission to record and use the test session results with your team, but also clearly protects the participant’s privacy and prevents the external publication or sharing of the recording.
Most importantly, ask the user to think aloud and not to be afraid of talking too much. Let them know that if they ask you questions about how to do something with the app you won’t be able to answer, as you need to replicate the environment of them using the app alone.
As moderator of the session, it is your responsibility to stay objective and to listen. Set a simple task first, to get the participant comfortable. Be careful not to elicit the responses you’d like to hear by asking leading questions. Instead, give encouraging, noncommittal feedback and only rescue the participant from an incorrect path after you’ve given them sufficient time to self-correct.
If you need the participant to explain their actions or reactions don’t include any opinion in your questions. You might ask:
“Could you describe what you’re doing now? ”
“What are you thinking now? ”
“Is this what you expected to happen? ”
After the test
When the time is up or the task is complete, be sure to thank the participant again. These test users might become your first word-of-mouth evangelists, especially if they really are the target market for your app. You might have included time for a short app satisfaction rating in the test period, in which case ask the participant to complete it immediately after the test.
Once the participant has been shown out, capture notes and insights immediately. It’s better to write down all the thoughts from the test, even if some seem insignificant: you can always filter them out later, but you might also find a pattern in later tests.
When all the test sessions are complete, review the findings, extract the high priority and common issues, and implement relevant changes as soon as possible.
Summary
A prototype test reveals useful insights into the effectiveness and potential of your app. At the bare minimum, sketch a rough interface on paper and discuss it informally with a relevant potential user.
- List the elements on each page, then group and prioritise.
- Mock up low fidelity variations of interface elements with pen and paper.
- Wireframe and prototype the key app interfaces.
- Mock up high fidelity prototype interfaces with whatever tool suits you best, from pen and paper to specialist mockup software.
- Test your prototype before showing it to test participants.
- Decide what you want to measure before conducting the tests.
- Use scenario-based tests rather than specific, leading questions.
- Test participants should be relevant to the app. Ask friends, online contacts and use local classifieds if you need to.
- Reward participants with a small token gift. You shouldn’t need to spend more than £20 for each forty-five-minute test session.
- Record all test sessions with a cheap video and microphone.
- As moderator of a test session, you should mostly listen and ask why choices are being made. Don't ask leading questions or give hints, unless absolutely necessary.
- Capture notes immediately after a test session, and implement changes to the interface as soon possible after all sessions are complete.
 Also available to buy in a beautiful limited edition paperback and eBook.